Business Unit Category
Add an email signature
Coding Restrictions
Create new Business Unit
Custom Fields on Line Items
Customised labels
Date formating
Default delivery address
Division Management
Editing Email Templates
How to hide cost codes
Invoice email forwarding – Microsoft 365
Pros and Cons of Using Zahara’s Inbuilt Email Service vs. Your Own SMTP
SMTP & Email Sending
T&C on your PO Template
Invoice Processing Help Category
Auto reject supplier invoices
Auto rejecting of invoices issue
Finding an order or invoice
How to create a credit note
Invoice email forwarding – Microsoft 365
Invoice export colours
Invoice Inbox
Invoice List View
Invoice matching
Invoice Processing Explained
Month end cut offs
Negative Order Balance
Setting up Autopilot
Supplier Matching
Waiting for a GRN
Purchase Orders Category
Adding a product to an order
Adding documents to an order
Bulk importing orders
Close Orders Automatically
Closing an order
Copy PO to Buyer
Creating a Purchase Order
Deleting a PO
Duplicate Order Prevention
Editing an order
Finding an order or invoice
GRN an Order – Learn with this Guide
Grouped Purchase Orders
Import Line Items
Negative Order Balance
PO Template Editing
Product Centric Buying
Purchase Order Numbering
Purchase Order PDF
Purchase Order Prefix
Purchase Requisition Number
Quick Create a Purchase Order
Send PO to Supplier
Supplier order acceptance
What is a Purchase Order?
The Payer is the last role in the payment process. They are responsible for providing the final authentication for the payment to proceed. This is only available once the invoice has been fully approved via the invoice workflow in Zahara, as well as the Payment approval workflow.
There are two ways of paying an invoice which has been fully approved. The Payer can select invoices to be paid from the invoice list view, and select the ‘Pay with Currencies Direct’ button. This is especially useful for bulk paying invoices. They can also click into an individual invoice to review in more detail, and pay from here.
This will bring them to the payment screen. Please note that all invoices on this screen will be paid, the check boxes are present so you may remove invoices from this selection as shown below:

Making the payment
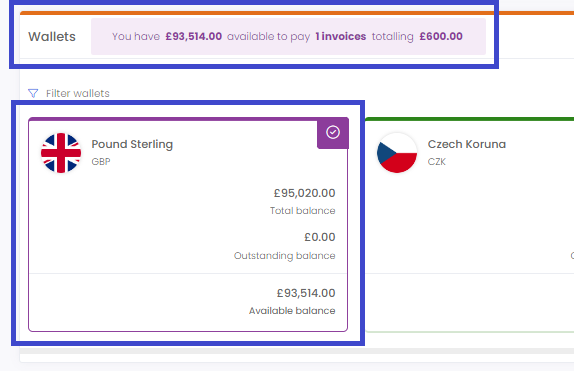
To proceed with the payment, the Payer must first select the Currencies Direct Wallet to be used for the payment. This must be one of the listed wallets. You can only select one wallet per payment run.

If a wallet selected is not for the currency of the invoice, the exchange rate will be shown underneath the wallet panel. This updates every minute with the latest rates.
There are two mandatory fields that must be filled out for the transaction to proceed.
Confirmation
A window will pop up once you have submitted to confirm the payment. At this stage you will have to enter the code provided by your two-factor authentication application- this is a requirement for all Payers. Please scan the QR code provided under the Payment Authorisation button in the business settings with any authentication application to set this up. For more information on this, please read our Currencies Direct Setup and Settings guide.
Finally, you will see a confirmation screen to inform you that the payment has been sent through to Currencies Direct to process. The status of the document will change accordingly.